fbpx

Keeping the Vintage Cool During a Panel Upgrade

Garmin’s GI 275 flight instruments update a 1953 Cessna 170B panel without sacrificing its original round gauge aesthetic.

I’m aware the outside of my airplane appears to have been flown through clouds of German flak. I’m aware the interior bears more resemblance to a clapped-out 1973 Chevy El Camino than to any modern or properly-restored Cessna. And I’m aware there are many simpler and more affordable ways to improve my airplane.

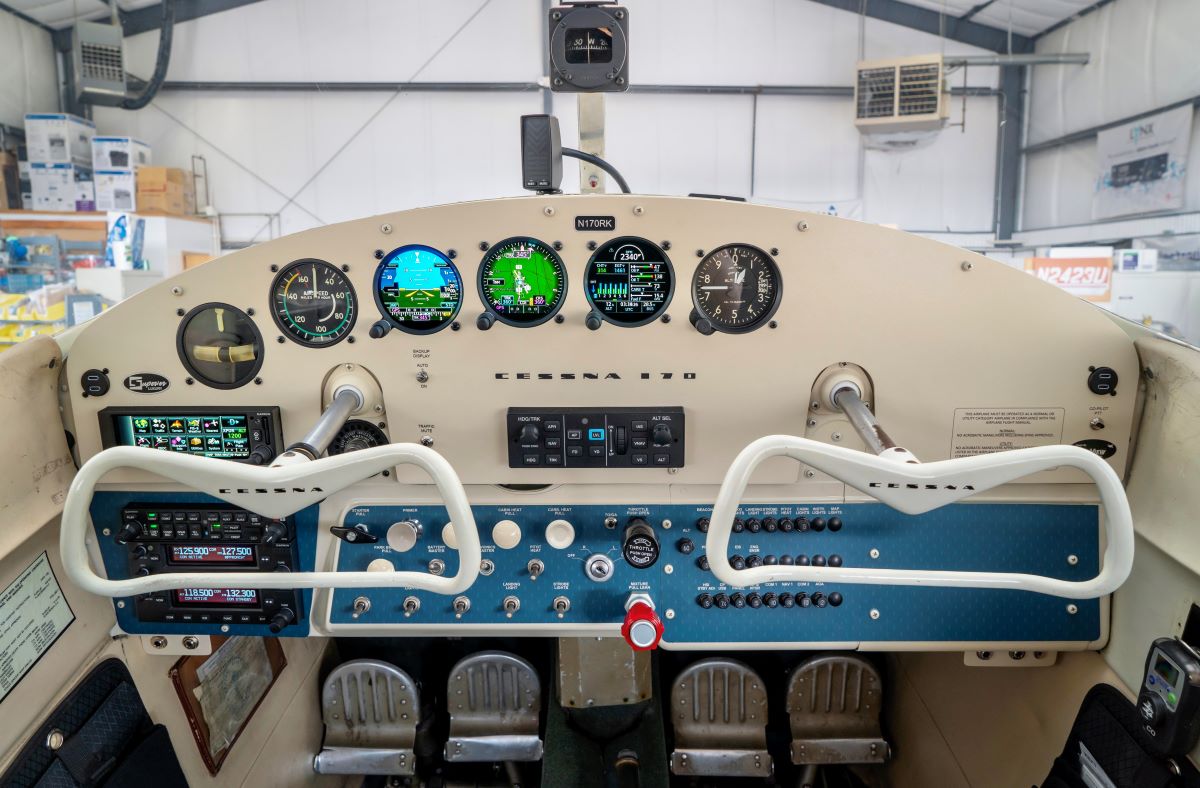
But when opportunity knocks, you take notice. And when that knocking comes in the form of an ambassador partnership with Garmin, you answer the door. This opportunity (separate from my work with FLYING) is what motivated me to take the plunge and spend tens of thousands of dollars on a full instrument panel upgrade on my 1953 Cessna 170B, and it is finally complete.

The project began back in May, and my friend Jessica Voruda at NewView Technologies in Oshkosh, Wisconsin, began teaching me the intricacies of instrument panels right away. I dove into the project bursting with enthusiasm but ready and willing to face complex, unforeseen, and expensive challenges. Fortunately, Jessica’s expertise and patience kept these to a minimum, and we were able to focus on some of the more fun and less easily anticipated aspects of the panel redesign.

After addressing a few of those items, we were able to dig into the part I was most looking forward to—the aesthetics and visual design. Although my plane has seen various updates over the years, some authentic 1950s-era visual elements remain. For example, it had an extraordinarily cool vintage blue diamond pattern surrounding the throttle quadrant, and I decided early on that I wanted to retain that element at all costs.

Similarly, I’ve always appreciated the retro look of the panel itself. Unlike modern panels that tend to be squared off on top with a horizontal glareshield, mine is curved on top. It looks cool and opens up some decent-sized peripheral vision chunks that might otherwise be blocked by a larger, squared-off design.

So I knew I liked the original, vintage aesthetic. But looking at modern avionics, I wasn’t thrilled with the idea of installing what amounts to big rectangular computer monitors smack dab in the middle of my panel. This is a 1953 Cessna, after all—not a Tesla Model S. I may be upgrading to modern avionics, but I still wanted it to look like a cool vintage airplane.  

While the existing panel functioned reasonably well for basic VFR flight, it presented ample opportunity for improvement. [Credit: Jessica Voruda]

Looking around at other modernized panels, I spotted another popular trend—emptying a panel of every extraneous gauge and installing just one or two modern digital screens in their place. While this is beneficial in terms of weight savings and simplicity, I just couldn’t get behind the look of a massive, blank wall in front of me punctuated by just two or three small screens. To me, it looks incomplete. It felt akin to hopping into a base-model rental car and spotting all the blank spots reserved for options that were left behind at the factory.

Salvation came in the form of two things—Garmin’s GI 275 flight instruments and Jessica’s Tetris-like skill at shoehorning a large volume of avionics into a tiny, irregularly shaped space.

The GI 275 instruments were new to me. I was familiar with and had, in other aircraft, used Garmin’s square-screened G5 instruments in the form of an attitude indicator and DG/HSI. But for a 1950s-inspired retromod panel, the television screen looked out of place. 

The beauty of the GI 275s is that they’re round and, thus, closely resemble vintage gauges. When in operation, they illuminate brightly and display everything from an attitude indicator to an engine indication system…but even when displaying moving maps and colorful bar graphs, they still blend in with old gauges. I decided they’d be the perfect solution for blending modern capability with a vintage aesthetic.

To avoid the aforementioned “empty panel” look, I opted to retain a few legacy analog gauges, namely the turn indicator, airspeed indicator, and altimeter. I did this for two reasons. First, because I appreciate having a physical ball and needles that sweep across part of my field of vision. But also to create a curved line of gauges that follows the curve of the glareshield like the panels of earlier 140s and 170s. With Voruda’s help, I arranged and rearranged the gauges into my desired positions.

From there, Voruda and the team at NewView got to work fitting everything into the panel and design. It turned out to be a tight balancing game, keeping the radios and GI 275s clear of the large T-shaped bar behind the panel that required ample internal space for elevator control. But she managed to do so, and the radios and GPS/transponder slotted nicely into the left side of the panel, leaving space elsewhere for an iPad and autopilot controls. While an autopilot isn’t in the cards just yet, I had Voruda prepare everything for easy and efficient installation in the future.

With the mechanical layout locked in, we focused on the visual design. Taking her advice, I opted for a cream-colored panel that matched my yokes and switchgear. This was true to the original interior colors, and it would be warmer, with more personality than black or gray. 

When I explained how much I liked the blue diamond pattern, Jessica pointed out that her panel fabrication partner, Superior Aircraft Components, could digitize the original design and extend it to the new overlays that cover most of the lower section of the panel. I loved the idea, so they got to work creating matching surrounds for the radios and circuit breakers. Because we were pressed for time, they also fabricated a separate, removable section of the sub-panel on the lower right, reserved for a future custom glove box. 

In addition to digitizing and renewing the original blue diamond pattern, we replicated the original Cessna typeface for a vintage logo in the center section. [Credit: Jessica Voruda]

As of this writing, the panel is complete, but I have yet to see it in person. My airplane sits up at Oshkosh, awaiting my arrival for AirVenture several days from now. Once there, I’ll be able to take it all in, begin learning how to use it, and then taxi from NewView Technologies on the north side of the field down to the Garmin booth at Boeing Plaza, where it will be on display for all to see. 

On one hand, it has been a leap of faith to spend such a sum of money on something when I am only able to observe the progress through photos. Part of me has wanted to make the 90-minute drive every weekend to check up on things. But from the beginning, I decided to place my trust in Voruda and her team of actual professionals; throughout the process, when she would ask me to make a decision, I would usually ask what she would do if it was her panel and then go with that.

This dedication to trust was partially inspired by some of the more questionable paint schemes I see on privately owned aircraft from time to time. In each case, the owners spent upward of $20,000 for new paint jobs but clearly opted to avoid hiring or trusting a professional to help create a visually pleasing design. Instead, their freshly painted airplanes are visually misshapen and unbalanced, resembling crude renditions of travel trailers from the late 1990s. The paint application and workmanship are impeccable, but less-qualified, amateur decisions hamper the end result.

For my panel, I decided early on not to go it alone. I’m not a professional avionics technician, and while I have some general goals and ideas, I’ve never designed or built an instrument panel. I was hiring a team of professionals to do that, so it only made sense to know my limits and defer to its expertise while providing general overlying goals. 

The end result appears to be perfect. I’ll have an airplane far more IFR capable than me and my instrument skills that lapsed during the Bush administration. I’ll have a lighter, more reliable airplane with avionics that enable me to extend the life of my engine through precise control and temperature management. And multiple moving maps, ADS-B traffic data, weather data, and sophisticated flight instruments, including an angle of attack indicator, will make me safer.

On top of it all, the unique restomod aesthetic will create an entirely new flying experience that gives me yet another reason to look back over my shoulder as I walk away after a flight.

Author’s note:

If you plan to attend EAA AirVenture (Monday through July 30), please stop by the Garmin display to check out the new panel for yourself. Let me know what you think at the FLYING Magazine booth  located in exhibitor spaces 439 and 440, just east of the control tower. I’ll be there from 1-2 pm CDT on Tuesday and July 28 for meet and greets and would love to hear your impressions.

Login

New to Flying?

Register

Already have an account?