fbpx

Short and Rough Field Landings

When the landing margins shrink, skill and experience matter.

We all have to learn how to perform short- and soft-field landings as part of the training for the private pilot certificate. The short-field landing is one of the most difficult maneuvers because of the precision required to pass the task. You have to maintain the approach speed to accuracy and land the airplane within 200 feet of a designated landing point.

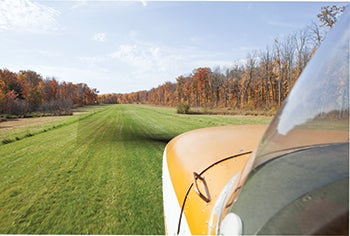
But precision landings should not be forgotten after your designated pilot examiner signs your certificate. With good short-field technique and proficiency you can fly into scenic, serene areas inaccessible by any means other than small airplanes. While the subject of short-field landing skills might conjure up visions of mountain strips tucked away in scenic alpine valleys, the truth is, even those of us who live in the flatlands can benefit from honing our short-field skills. Whether it’s landing at a short field that’s home to your shade-tree mechanic, making use of that short crosswind strip when the longer main strip is closed for repair or just stopping in at a cozy out-of-the-way airfield, having the skills to fly your airplane to within shouting distance of its performance capabilities makes the airplane more useful and you a better pilot.

The point you must be sure not to miss is that landing on short airstrips consistently and predictably requires skill and proficiency. While floating 1,000 feet down the runway on your 7,000-foot home runway might seem a meaningless bit of sloppy flying, when it comes to short fields, it could be a terrible mistake.

Optimizing Landing Distance
You can practice short- and rough-field landing techniques at any airport. Having a few thousand feet of extra runway is a great margin of safety, and with the runway distance markers, you can easily determine how short each landing is. It’s not worth pushing your luck on a 1,500-foot runway just to prove you can do it without knowing how short you can consistently land the airplane.

The first thing to do is figure out the direction in which to land to make your landing as short as possible by carefully evaluating two main factors, the first being wind speed and direction and the second the slope of the runway. Though there are relatively few occasions where slope enters into our Lower 48 flying, it’s likely we all have one or two favorite destinations with runways that have a bit of a slope to them.

For airports that are sloped, it is almost always best to land uphill. “Every 1 degree of grade gives you ­10­ percent more runway length,” says Lori ­MacNichol, owner of McCall ­Mountain/Canyon Flying Seminars. A 10 percent decrease in the landing distance would require about 10 knots of headwind component for most airplanes. So if you’re landing on a gradient of 3 degrees, landing uphill essentially gives you a 30 percent improvement in runway length. You would need a lot of wind to counteract that.

Uphill/downhill landing strips might be the exception to the rule, but wind is everywhere we fly. Its effects are stronger and more critical than many pilots understand. You don’t think so? Check out the National Transportation Safety Board accident reports, which are filled with mishaps caused by the pilot in command making poor wind-related decisions.

When it comes to wind, the rules in theory are relatively simple. Know its speed and direction before you land (or take off), and factor that information into the plan. A landing on a 1,800-foot-long strip with a 10-knot headwind is doable for many light singles, but landing on the same runway with a 10-knot tailwind could be a recipe for disaster.

In practice, there are, as we all know, forces of the local geography we need to understand too. Tall trees on short final, a nearby body of water, hangars or other buildings located near the runway and numerous other features can all add unpredictability to the wind near ground level. Be prepared for wind variability, and be ready to go around if things aren’t working out. Another try or another, longer runway might be the solution.

MacNichol has a training program designed to teach pilots how to fly safely in the mountains. The program is predicated on the concepts necessary for safe flying in the mountains, but most of its principles apply equally well to less exotic locations. MacNichol begins by flying a series of stalls in different configurations and completing an aircraft performance worksheet. Based on the numbers from the performance sheet, several parameters for speed and power are established, among them the optimal approach speed for short-field landings. And this speed is generally very slow. The approach speeds for the modified Super Cub and Carbon Cub MacNichol uses are between 35 and 40 knots, much slower than the conventional singles many of us fly.

But the point is, regardless of what you’re flying, speed is critical to short-field landings because the slower you are going when you touch down, within a margin of safety, the shorter the landing distance will be. Full flaps will allow your airplane to safely fly slower while maintaining a safe margin from the stall, and full flaps is a recommendation you will find in the section of the airplane information manual that talks about short-field landings.

Before you land at a short and/or rough field, get to know the runway first. Just as floatplane pilots routinely overfly their intended touchdown spots, searching for debris and half-sunken hazards, we land-plane pilots are smart to overfly an unfamiliar short field to get a look, literally, at the lay of the land. How is the surface? What are the winds like? Are there any hazards (potholes, ditches, cables) you might not be able to spot from your view on short final? There’s a lot of good information to be gleaned.

You need to also carefully consider the approaches to the runways. Are there obstacles? Is there high terrain? If you need to go around, should you make that call early on the approach because of high terrain? What is the best way to turn if you do need to go around? These considerations are best made before you need to make the call.

Power management is also key, though answers here might not be so clear. Many manuals recommend reducing the power to idle once any obstacles are cleared. But if you reduce the power to idle, you will destabilize the approach and be more likely to touch down hard. A hard landing is fine for short fields, but on rough fields you could get yourself stuck. A more desirable tactic is to set up a stabilized approach with some power. A stabilized, power-on approach will allow you to maintain a steady pitch while managing the power to guide you to a specific point on the runway.

That specific point is called the aim point. Most often, the aim point will be near the approach end, but a careful scouting mission may determine that the approach end is too rough, in which case you may need to adjust your aim point further down the runway. (Take the runway length into consideration if your aim point is not near the approach end. If there isn’t sufficient runway length and the runway condition is questionable, don’t land.) Patches or lines on the runway of different colors may be signs of dips, ditches or other rough spots you should avoid.

With the aim point in mind, get yourself configured with full flaps and at the target approach speed early to set the airplane up for a stabilized approach.

While the school of thought varies from pilot to pilot, using pitch to maintain the airspeed and power to control the approach path is generally preferable. Use the aim point as a guide in the windscreen. If the aim point appears to descend in your field of vision, you are getting high and need to reduce the power. Conversely, if the aim point appears to float up in the windscreen, apply more power to get back on your approach path. Make small, timely corrections to maintain as stable an approach as possible.

Since the approach speed is likely only a few knots above stall, it is critical to fly accurately. MacNichol challenges her students to stay within 0 knots below and 1 knot above the target speed to enable the shortest landing possible while minimizing the risks. That demands a lot more accuracy than the commercial pilot practical test standards, which only require you maintain your approach speed within plus or minus 5 knots. But why not push yourself to make every approach and landing as accurate as you can, even when you’re landing on a 5,000-foot paved runway?

Flying a stabilized approach is always important, but it’s critical for short-field landings. If you get too high to correct the path with power you can slip the airplane, but keep in mind you’re probably better off going around and re-establishing your approach path than trying to fix an approach that is not stable. And avoid getting low on the approach, particularly when there are obstacles around. In addition to helping you clear any obstacles near the runway, a steeper approach makes it more likely for you to reach the runway in case you have an engine failure.

If you have any doubt about the safety of the approach, go around. If the approach looks good, however, the goal is for the touchdown to be precise, without float, much like a Navy pilot’s carrier landing, but at the same time soft enough to prevent getting stuck in the soft surface. If you feel your descent rate is too high, you can arrest the descent with a short blast of power to cushion the touchdown. Once your wheels touch the ground, immediately pull the power to idle, maintain back pressure on the yoke or stick to keep the nosewheel off the ground and retract the flaps to minimize the landing roll. If you’re landing on a rough strip with a slight grade, you will likely need minimal, if any, brakes to stop the airplane. But on a hard surface, you may need to apply heavy brakes to get the airplane stopped in the shortest distance.

Know the Airplane
While taildraggers such as the Super Cub, Husky and Cessna 185 are excellent short-field performers because of the tailwheel configuration, which gives good prop clearance, along with their good stall and slow flight characteristics and the ability to put on oversize tires, the range of airplanes you can use for short and rough fields is wider than you may think. We spoke to a number of owners of tricycle-gear airplanes who regularly fly their airplanes into gravel and grass strips not much longer than 1,000 feet.

Regardless of the type of airplane you fly, you need to be intimately familiar with how the airplane behaves in different configurations in order to land safely at these types of airstrips. Know its characteristics when you’re flying at its slowest approach speed, when it’s hot and when it’s high, and you’ll be able to precisely land your airplane as short as is safely and routinely possible. It should go without saying that you can learn a lot of this at altitude.

When you’re ready to test your skills, select an airport with a level of difficulty appropriate to your level of experience and the airplane you fly. Also, since many short and rough airstrips are in mountainous terrain, density altitude is a very important consideration that will degrade performance. Just because you can land your airplane within 1,000 feet at sea level doesn’t mean you can do it at an 8,000-foot density altitude. As you know, airspeed and ground speed are two very different things. At 8,000 feet field elevation it might seem as though you’re going fast on final approach even when you have the airspeed pegged at your usual, slow value. That’s because you are moving over the ground faster, much faster in fact, than you would at sea level, thanks to the density altitude. That high ground speed means longer ground rolls on landing.

So, how do you get good at short-field landings? The same way you get to Carnegie Hall — practice. Most certified flight instructors can effectively teach you how to make a short-field landing that will allow you to pass a check ride, but it takes an instructor skilled in short-field techniques to help you get to the next level. You don’t need to go to a 1,000-foot strip to practice these techniques. In fact, you shouldn’t. Stick to your home airport, and instead of making the aim point the end of the runway, make it the 1,000-foot mark or some other handy runway marking. No sense in taking the chance of landing in the rough short of the runway when there’s plenty of runway ahead of you. Then, once you’re ready to test your skills in the real world at a challenging airstrip, take along a highly qualified instructor who is also familiar with the area and the runway in question. With an experienced guide along to give you pointers and help you make smart decisions, the risk is lower and the learning opportunities are greater.

Login

New to Flying?

Register

Already have an account?