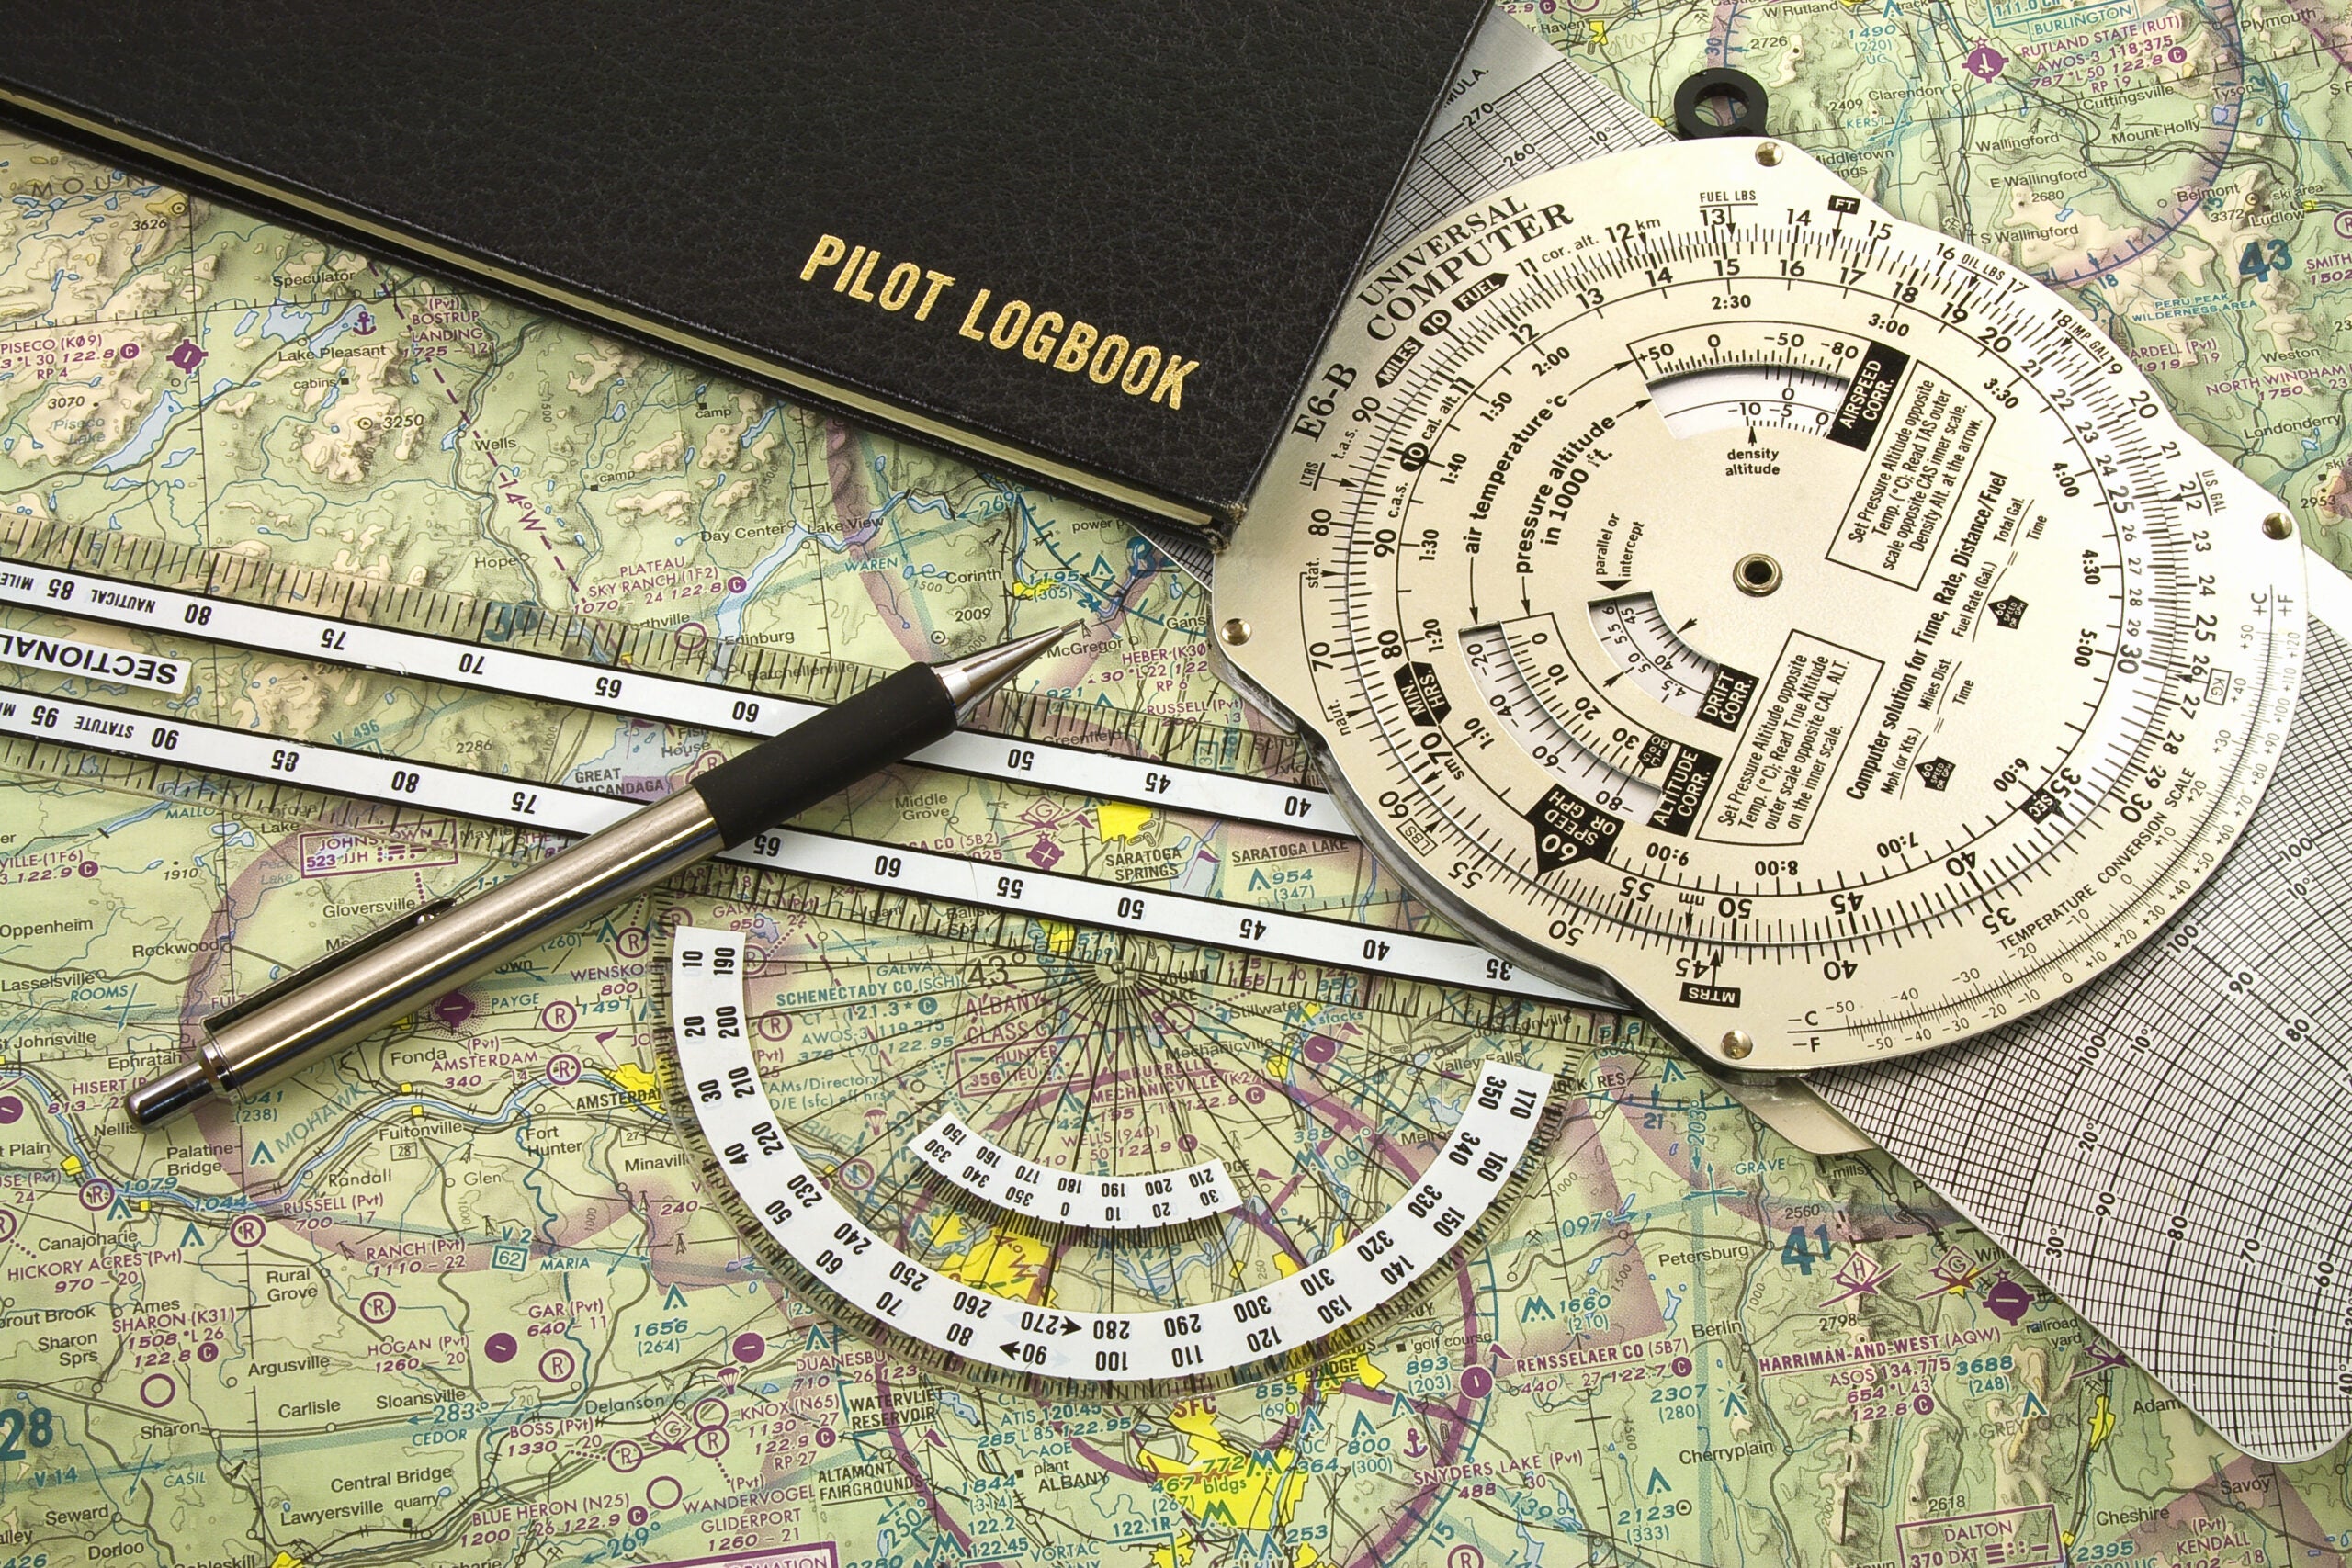

Using an E6B flight computer boils down to lining up values on circular rulers—the outside, middle, and inside known as “scales”—and reading the results. There is a great deal of information on the device, so we’re going to walk through how to decode it for best results.
All the easy-to-use features of the original, but adds a new, more rugged design and additional features.
Shop NowWhat Is a Flight Computer?
A flight computer is used by a pilot to determine aircraft groundspeed, time, airspeed and distance calculations, fuel burn, time en route, and density altitude. It also converts knots to miles per hour and vice-versa, true airspeed to calibrated airspeed and vice versa, Celsius to Fahrenheit, and calculates wind correction angles.
How Does a Flight Computer Work?
A mechanical flight computer is basically a slide rule on steroids. They work because someone has figured out the formulas (example: time, speed, and distance) and arranged the values on the scales of the device so that when numeric values line up, the answers the pilot seeks are there.
E6B Flight Computer vs. Electronic Flight Computer
An E6B flight computer, also known as a mechanical flight computer, is made from metal, plastic, or cardboard. It can be intimidating to look at and challenging to use at first—but fortunately, they come with directions. The formulas are printed on the face of the instrument for many of the critical calculations. There are also some fine videos online that can be used to learn how to operate the unit. The mechanical E6B does not require batteries and it does not break when you drop it. In addition, the metal E6Bs can be turned into cutting devices or shovels in a survival situation by sharpening the edge of the device with a rock.
The electronic E6B is a calculator on steroids. By plugging in the formulas printed on the instrument, you can get the information you seek. The electronic E6B is more precise than the mechanical E6B and is easier to read because the results print out on a screen. However, it requires a power source—often batteries—and the screen may be difficult to read in direct sunlight. It can also be damaged by heat and destroyed by impact if and when you drop it or crush it.
How To Use an E6B Flight Computer
The E6B flight computer looks intimidating at first—there are so many scales and numbers and formulas printed on it. But if you can read and follow the instructions—which are conveniently printed on the instrument—you can master the “whiz wheel” with a little practice.
Parts of the Flight Computer
The mechanical E6B flight computer has two sides: the windside, which a pilot uses to determine ground speed and wind correction angles, and the calculator side that is used to determine aircraft fuel burn, temperature and speed conversions, and time, speed, and distance calculations. There are three scales on the calculation side of the E6B, starting from the outside and working in, they are the A scale, the B scale, and the C scale.
It’s helpful to spend a few minutes looking at the fine print on the scales to see what can be gleaned from them. There will be acronyms such as TAS (true airspeed) and CAS (calibrated airspeed) and inside windows that provide information on density altitude.
You will also note there are rulers on the side of the unit that measure nautical miles for the sectional scale, and there is a temperature conversion chart at the bottom of the device.
Scale Values
The numbers on the scales represent varying values, so the user must apply some common sense. For example, one of the calculations you can do is time, speed, distance calculations.
We begin by placing the index pointer—that’s that arrowhead shaped thing on the B scale across from the Ground Speed on the A scale. So if the pilot determined that the ground speed is going to be 100 knots, the pointer will be opposite the number 10 on the A scale.
Let’s say you are trying to determine the time en route to cover a leg that is 13 nm. You know your ground speed is 100 knots and you put the pointer on 10, understanding that it is 100 in this case. Now, find the number 13 on the A scale. Directly below the 13 on the B scale will be the time en route in minutes. No. 13 is directly across from 78. Common sense tells us that it won’t take 78 minutes to travel 13 nm, so the correct answer here is 7.8 minutes.
Calculating Knots/Miles Per Hour
Calculating ground speed, be it in knots or miles per hour (mph) is done on the wind side of the E6B. To get this value you will need to have obtained a weather briefing to get the direction and velocity of the winds before you solve this problem. Let’s say, for example, the winds are from 220 at 10 knots.
Note there is a hole in the center of the face on the wind side—this is sometimes called the grommet, and it creates the center of the face. Place the grommet on one of the heavy horizontal lines. It really doesn’t matter which one, because you establish that this line is the base or zero. Note the horizontal lines are marked in 10-degree increments. Mark the wind velocity up from the dot—so in this example, you would find the next heavy line 10 degrees up and, using a pencil, mark the dot. This is the wind dot. Pro tip: if you are going to be calculating multiple wind velocities, for example at different altitudes, use a different symbol for each. For example, for the winds at 3,000 feet, use an X, and for the winds at 6,000 feet, use a dot, etc. Another method is to use a water-soluble marker in different colors—write the “key” for the wind direction on the nav log: 3,000, red; 6,000, green, etc.
The next step is to place the plotter—that’s a big ruler made of plastic necessary for navigation—on the sectional to determine the true course (TC). Once you have this value, find the TC on the rotating scale on the windside of the E6B and place it under the true index.
True airspeed (TAS) is found in the aircraft performance manual section of the pilot’s operating handbook for that particular airplane. There is a chart that lists TAS for powersettings, altitudes, and temperatures.
For this example, we will say the true course is 190 degrees and the true airspeed is 110.
Slide the wind dot until it is on the horizontal line that has the value of the true airspeed—in this case 110—on the E6B and read the ground speed directly under the grommet—which in this case, is 102.
Calculating Speed, Distance, and Time
Calculating ground speed, be it in knots or mph, can be done by finding the distance traveled and the time it took to travel that distance. This is known as a ground speed check. To do this, you need to know the distance from ground checkpoint to ground checkpoint. This information is written down in the nav log. The pilot obtains this information by measuring the distance on the sectional by using the nautical miles scale on either the plotter or on the ruler marked sides of the E6B.
Let’s say the aircraft is over Big Lake and your next checkpoint is College Campus. You measured the distance and have determined it is 15 nm. You started the timer in the aircraft when you were over Big Lake. When you reached College Campus, you note it took 8 minutes to get there.
Line up 15 on the A scale over the 8.0 on the B scale.
Now note the pointer is lined up with 11.2 on the A scale. Here’s where we use some common sense again—11 mph or 11 knots wouldn’t make sense—but a ground speed of 112, does, and that’s the answer.
Now, let’s try one where the pilot knows the ground speed but isn’t sure of the time it will take to get there.
The distance is 21 nm. The pilot determined the ground speed for the flight would be 120 knots.
Place the index under the 12 (which represents 120 in this case) on the A scale.
Find 21 on the A scale. Directly across from it on the B scale will be the time en route: roughly 10.5 minutes.
Now, let’s solve one for distance. Our pilot knows the ground speed is 120, and has been flying for 10 minutes but hasn’t been paying attention—how far have they traveled? Keep the pointer on the ground speed of 120—note the time on the B scale of 10 minutes—directly across from the time on the A scale is the distance traveled: 20 miles.
Calculating Fuel
In order to calculate fuel burned during a flight, you need to reference the fuel burn charts from the aircraft manual or pilot’s operating handbook for the aircraft. The chart shows the estimated fuel burn per hour as determined by powersetting, temperature, and altitude.
You will also need to know the time en route, factor in the time and fuel spent for taxi and takeoff, approach, and the necessary fuel reserves.
Let’s say the pilot determined it would take approximately 20 minutes to do the run up and taxi for takeoff.
The pilot, using the Time to Climb chart in the POH, determines it will take 10 minutes to reach the designated altitude.
The pilot determines the en route time will be 67 minutes.
The pilot figured 10 minutes for the landing approach.
The regulations call for a 30-minute fuel reserve for VFR flight.
According to the fuel consumption chart in the POH, the fuel burn per hour at the power setting and altitude the pilot has selected is 8.2 gallons per hour (gph).
Total up the time: 20 minutes for taxi/takeoff + 10 minutes time to climb + 67 minutes en route + 10 for approach + 30 for reserve = total fuel required.
Place the point on the calculation side of the E6B to 8.2 on the A scale.
Total up the minutes flying + the fuel reserve = 137 minutes
Find 137 on the B scale—directly across from it on the A scale is 18.8, so the total fuel required for this flight is 18.8 gallons.
Calculating True Airspeed
To calculate your true airspeed (TAS), set your pressure altitude across from the temperature in Celsius in the air temperature window in the center of the E6B.
If needed, use the temperature conversion chart at the bottom of the instrument that can be used to convert Fahrenheit into Celsius.
Opposite the calibrated airspeed (CAS) on the B scale note the true airspeed (TAS) on the A scale.
Calculating Density Altitude
Density altitude is a condition that affects aircraft performance. High density altitude conditions are encountered when there are high temperatures, high field elevations, or high humidity. You only need one value—high temperature, elevation, or humidity—to experience high density altitude.
To calculate density altitude you need to know the temperature and pressure altitude (what the altimeter reads when set to 29.92 in the Kollsman window) but lacking that, use the field elevation which can be obtained off the sectional or airport website.
Find the density altitude window on the E6B. Line up the temperature given over the pressure altitude value or field elevation in the center of the E6B on what is known as the C scale.
Let’s say the temperature outside is 102 degrees Fahrenheit, and the field elevation is 4,000 feet msl.
Use the scale at the bottom of the E6B to convert the temperature to 40 degrees Celsius.
Find the air temperature window on the C scale and line up 40 degrees over 4,000 in the pressure altitude window. The density altitude can be read in the window—conveniently labeled density altitude—in this case, it reads approximately 7,000 feet.
The Most Useful Tool in Your Flight Bag
The E6B is a necessary tool for all pilots—yes, there are apps that can perform these calculations for you, but they require a power source to operate, and if the device is broken or runs out of juice, you are in a bad situation. You may find it easier to use the mechanical E6B for multiple applications—for example, let’s say you have determined that your ground speed for the flight will be 107 knots. Place the pointer on 107, then look on the A scale and note the distances of the checkpoints you have selected: 16 nm, 21 nm, 19 nm. How long will it take you to reach each one? 9 minutes, just under 12 minutes, and 10.5 minutes—all computed with a glance, as opposed to having to clear and re-enter integers into an electronic E6B. However, the electronic E6B (because it is essentially a calculator) can be easier to use for some people.
FAQ
How do you convert calibrated altitude to true altitude?
Set pressure altitude opposite C in the window. Opposite CAL ALT on B scale read TRUE ALT on A scale.
What is better, an analog (mechanical) or electronic flight computer?
Analog (mechanical) devices, once you learn to use them, are quicker to use because you can set the pointer on the ground speed and simply glance around the whiz wheel to see the estimated time en route. With an electronic flight computer, you have to keep re-entering the equations. In addition, the mechanical E6B is not temperature sensitive, and because it is made from cardboard, plastic, and/or metal, it is less susceptible to damage if dropped. However, some people find the multiple scales on the mechanical E6B intimidating and prefer the relative straightforwardness of the electronic flight computer.